The escape room that we made last year was so much fun that I knew that we had to do it again. But we can’t just do the same one, that would be boring and kids would already know most of the answers. So I knew we had to start from scratch. That sounds really daunting but once you’ve made one, making another one is SO much easier.
When I was designing the new theme, I knew I didn’t want to do a crazy librarian’s office like I did last year, since EVERYTHING would have to be new. So if you ever end up designing your own escape room, remember this rule: go with what you already have. Don’t go out and buy a bunch of new stuff to fit a theme that you’ll never use again. Whatever’s collecting dust in your basement will often make for great set dressing for your room, and you can build the theme around that.
So remembering that, I knew what my new theme would be: an art gallery! We have a bunch of big mats and frames in our basement that I use to hang artwork for our Youth Art Show in March. So what we did is turned our event space into an art gallery with original photos and artwork, which was used to solve the puzzles. BRILLIANT!


Set Up:
The great thing about this theme is you can decorate it as simple or as complex as you want, as we did a variety of original art and reproductions we found online. You can make the art yourself if you have the time and the skill, like I painted this Lichtenstein-ish library comic to add some extra flare.

You can also ask your circ staff to just draw and make stuff for you on their downtime, like Jess our circ assistant comes from an art background and she made some great pieces and was a huge help.
If that doesn’t float your metaphorical boat, you can always just find stuff on the Internet and put it up. Miss Gloria was a huge help and found some funny portraits that she hung up that the kids got a kick out of. She also decorated the tables with a bunch of art projects she made with the younger kiddos at Craft Night. She also came up with all of the name tags for the art pieces, which was a nice touch to make it look like an actual art gallery.

The Plan:
I liked that last year’s room didn’t involve anyone actually “breaking out” or escaping from the room. So again the end goal would be to open a locked box of candy. So this brings us to the next design rule: work backwards. Last year, our kiddos had to solve three puzzles to find a key. Since most of the groups figured it out fairly easily, I thought this time I would up the stakes and have them solve four puzzles.
Again, it helps to draw out a map of all your puzzles. My final map looked like this:
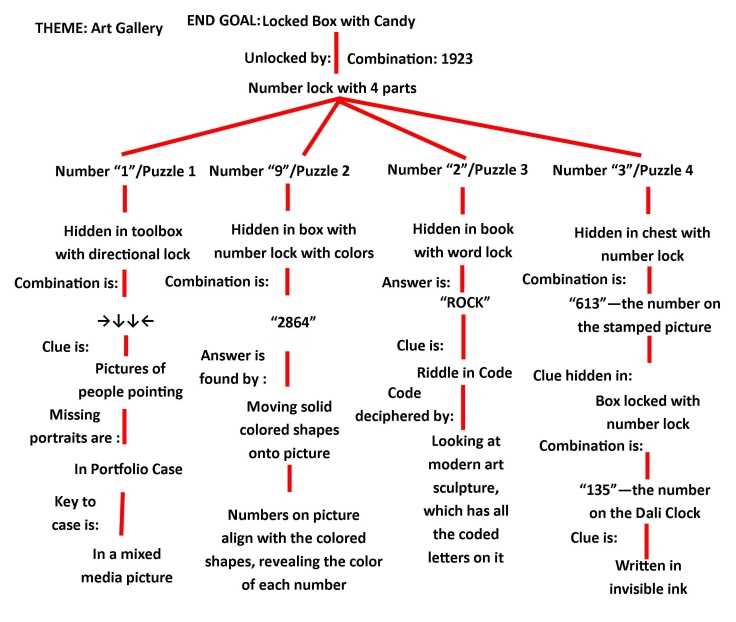
So like last year’s room, the kiddos would have to open a box with candy bars in it. The combination for the final lock had 4 numbers in it, and to get all four numbers, they would have to unlock 4 other boxes. The combination for that final lock by the way was “1923” which was the year Roy Lichtenstein was born (my favorite artist.)

Side note: getting boxes that have a latch on them in order to put locks on is always the hardest part, BUT I think I found a way around that. Take a discarded book, drill a hole into it with a power drill, and attach a lock to it! Such a good idea!

Puzzle 1
To get the first part of the final lock, the kiddos had to had to unlock a box with a directional lock on it. It’s a really interesting lock that I knew I wanted to incorporate into the room, so again, I worked backwards from there to try and find a puzzle that would work with the theme.

The answer for this lock was “RIGHT, DOWN, DOWN, LEFT” so I thought it would be cool to have some portraits point out the right combination.

Only problem is that two of the portraits are missing, with a tape outline on the wall as to where they should be. The missing two pictures were locked up inside a big black portfolio case I borrowed from one of the art teachers.
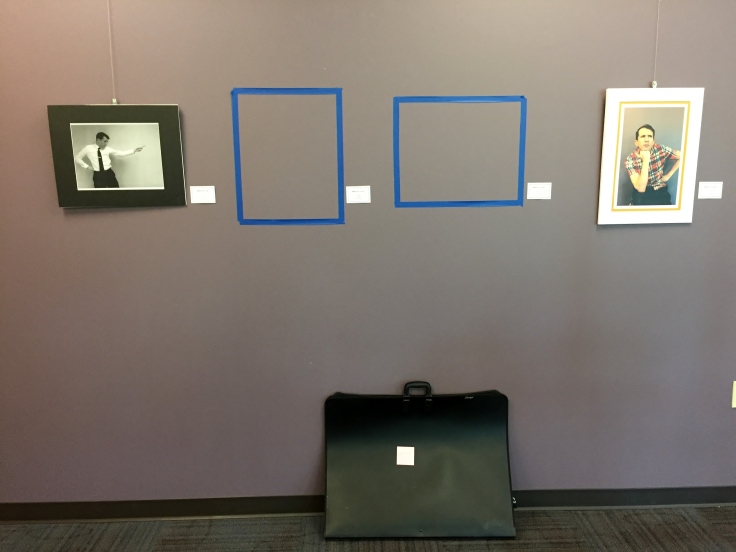
I hid the key to that case in a mixed media art piece, which I made with some loose ends we had lying around the library.

Once they found that key, they could unlock the portfolio, find the missing portraits, put all four together and eventually figure out that the four portraits give the answer to the first lock.
Kiddos kinda got stuck on this one. Some kids were confused by the third photo in the series since it kinda looks like I’m holding a thumb up and one thumb down. So if you do this, make sure it’s clear where you are pointing. Also this lock liked to stick, so I had to actually open it up for all 3 groups. I did ask them what the final combination was, and when I finally got the correct answer, I would help them open it.
Puzzle 2
To get the second part of the final lock, kids had to find a way to open this lock with four different colors on it. It was another one I found online, and I knew I wanted to incorporate the different colors on the tumblers.

So the solution for this puzzle was “2 8 6 4.” Each part of the lock has a specific color, which matched the exact same color as a statue placed somewhere in the escape room. Also in the room on of the display tables will be a picture of numbers with shapes around some of the numbers. The bases of the colored statues align perfectly with the shapes, revealing the combination!! So for example, the first part of the lock is red and the answer is “2.” The solid red horse’s base aligns perfectly on the picture in that space with a “2” in it. Get it??

I purposefully picked the star as one of the bases so that kids would hopefully recognize it easy in the picture and on the statue. Oh, I made these statues with stuff from the dollar store, the bases were also really cheap and can be bought at any craft store. This was the hardest one for most of the groups, but it’s good to have at least one hard one to eat up more time.
Puzzle 3
In order to get the third part of the final lock, our kiddos had to find a way to open the word lock, which we used last year. This is such a cool lock, and I thought this year around the answer to this lock could be a riddle that was hidden somewhere in the room.

Thinking on that, I came up with an idea of making a modern art sculpture that the kids would have to inspect at different angles to try and decipher the riddle, which would be written in “Pigpen Cipher.” We had a bunch of slotted, cardboard squares left over from a “Cardboard Construction” day, so Jess made this abstract sculpture really easily (again–work with what you already have.) Hidden along the panels of the sculpture were letters that corresponded with the cipher.

Miss Gloria came up with an easy riddle to decipher and what the answer would be for the lock. The coded riddle was hung up on the wall like a piece of artwork, and the sculpture with the cipher on it was in the opposite side of the room, so the kids would have to run back and forth to uncode the riddle.
Puzzle 4
The last part of the lock was a standard number lock with 3 numbers. To unlock it, they had to convert the date stamp artwork I made, which I purposely made into the date of our event.

There was a hint for what to do locked in another box with another number lock. The combination for that lock, was the time on a Dali clock that Miss Gloria made out of clay. That broke pretty quickly in the event unfortunately, but I did find a cheap one that you can buy:

There was a hint for that part of the puzzle, which said “check the time,” written in one of the frames in invisible ink. We had a UV light on one of the tables, and there was a kid in each group that knew what to do with it right away.
This puzzle was all pretty standard Escape Room stuff, so I think every group finished this one first, and that’s okay! I think it’s good to have an “easy” puzzle in there since you do have to consider the audience.
Reaction
We had 3 groups that had a half hour each to break open the box, the first two groups was 30+ kiddos each, and the last group was only 12 kids. Our first group solved it in about 20 minutes with hardly any help, but their were some teens in there that did a lot of the heavy lifting. The second group solved it in also 20 minutes, but they got a lot more hints from me, so I might have given too many things away. The last group was 25 minutes, and they needed a lot of help but there were probably too few kids in that group. So we should have spaced it out a little better in retrospect.
The 2 big groups worked fairly well together, but less kids is probably better so that everyone can kinda have their moment to help out. It’s always fascinating to see how kids solve the puzzles. There was a group of teens that noticed that there was a connection between the cipher picture and the sculpture from “Puzzle 1.” But instead of running back and forth like I intended, they just took a photo of the hung picture with their phone and just went back to the sculpture to figure it out. Smart!
Like last year, we went over rules before they were all set free to work out the room. Again, I started the clock and THEN talked about the rules, so that it was on their time, so everyone paid attention. Rules are pretty self-explanatory and will definitely help manage your event:

Also like last year, I stopped the group and huddled them around our clue table so that we could talk about clues and puzzles that were already solved, so that everyone was on the same page and felt included.
The biggest change from last year is I made a checklist that helped us reset the room in between groups. That was a huge help and made the reset go really fast. Here’s mine, all I did was take my “Room Layout” from before, and just stop and think about what steps in that layout will need to be reset, put back, and checked on to make sure it’s still in one piece.

Hope this inspired you. If you use any parts of this, let me know how it turned out, or what you changed!!!
All blog entries are for educational or personal use. Please credit the original author if reblogging or posting ideas originally found on this site. LEGO® is a trademark of the LEGO Group of companies which does not sponsor, authorize or endorse this site.


Our second escape room, with a Dungeons & Dragons theme was last week. One thing you’ve done that I will try to incorporate in the future, is flag your final clues (the cards with the padlock number and position). I had set up our room so the final solution was a padlocked box (containing the “dragon’s heart”–the prize was little plastic dragon figures), but 2 of my clues were a one-step path, and 2 were multiple steps, so my participants (families–adults & kids) tended to lose the thread as they solved their clues, and also needed some hint to know when they had reached the end of the trail. I’ve been doing Harry Potter and fantasy themes because that’s what I have in spades prop-wise, but your rooms have inspired me to think about a contemporary setting in my next attempt (particularly since our meeting room is almost identical to yours!). Your clue map was also very helpful in working out my script.
LikeLike
Sounds cool!! Glad it worked out!!
LikeLike
What was the riddle used for puzzle 3?
LikeLike
The riddle was “What beats scissors” and the answer was “Rock” obviously. Miss Gloria came up with both the riddle and the answer for the lock. We wanted it to be easy because the puzzle isn’t really about the riddle, it’s about seeing the cipher and the sculpture and realizing the two are connected.
LikeLiked by 1 person
I love this idea and am going to use it as my inspiration for this year. However, I will be doing this with 2nd-5th grade students so I will have to adapt it for this age group. Question…do you give all of the clues to the whole group at once or do you break students up into smaller groups and assign them clues? That is how I’m thinking of adapting this. Also, is your main objective to get the students moving through and learning your library or just to have a fun introductory activity? Thank you so much for all of your work on this!!
Julie
LikeLike
I would definitely recommend simplifying it if you’re doing it for 2nd-5th graders. My fiancee ran this same escape room at her library recently, and it really stumped her teens. I don’t know if you can really “assign” clues in an escape room. Since it’s such an interactive experience with seemingly unconnected parts working together, it’s hard to get a kid to just work on one part. And to answer your last question, the point for me to just make this a fun activity, with some learning about the library on the side. Thanks and hope it works out for you!!
LikeLike
I’ve never done an escape room before but I have a general idea in my head of how it would go. Can you give me an example of a clue you had for students? My goal is to get them moving around the library and to be familiar with the locations and names of locations (Non Fiction, Everyone Fiction, Biography). In regard to assigning clues I was thinking if I had 5, 6 or 7 groups of 5 kids each group’s end goal would be to get one of the numbers required on the combination lock that would open the final suitcase with the candy. Each group would have a series of clues they would have to find in order to lead them to that final number. Does that make sense? I appreciate your feedback on this.
LikeLike
Thank you for sharing:) we used this as part of our Community Service Day celebration. We decided to use the code idea. Instead of making a sculpture we decided to laminate art and then used a highliter to make the code around the pictures. Then they could use a uv flashlight to find the code. It was so much fun.
LikeLike
Oooh nice!! Glad this helped a bit 🙂
LikeLike
I think this is such a great idea! I have been wanting to do an escape room activity at the library I work, as I’m the teen program coordinator. I like the way you came up with all the art themed items. Very creative!
LikeLike
What a great theme! Thanks so much for sharing.
LikeLike
Thanks so much for sharing! I want to borrow this for our summer reading program this year. Since there were 2 locks, did you have the kids work in 2 teams? Were there any clues to get things going?
LikeLike
It’s been a long time since I did this one, but no I didn’t have people work on specific things. I feel that’s not really fun and that it’s better to just let kiddos run loose and see what happens. And no I didn’t really give any clues unless they were really stuck. They will almost always figure it out.
LikeLike