
We’ve done this twice now and I think we’ve perfected it by now. This is one I helped out with, but Gloria and Jess did most of the heavy lifting on this one. I helped out a bit here and there, but it was the equivalent of licking the spoon when you’re making a cake. It’s helpful but not essential 🙂
So Gloria saw the idea on Pinned Interests and wanted to bring it here. To make the squares, Gloria got a bunch of plastic table clothes from the dollar store; the colors we used were purple, blue, green, yellow, and red, which aren’t all the colors that are in the actual game but it worked out fine. She cut out squares that were 18″ x 18″ so she got six out of each table cloth.
When she was ready to set out the floor she laid them out in a zigzag, alternating the colors. I then went around and taped each square to the floor to make it last a bit longer. We tried to make as many of the stops as possible, since that’s what makes the game so special. Each stop had a candy bucket, and kids could take ONE piece of candy from each stop they passed. Make sure to emphasize one piece at the beginning. We had kids with so much candy that you could hear all their plastic wrappers crinkle when they walked. So volunteers stationed at the different stops might be beneficial.

While playing each group of 5-6 kids was given a dice with the five colors on it (purple, blue, green, yellow, and red) and a “Pick a Card” spot. If they landed on one of the five colors they would advance to that color. If they landed on “Pick a Card” they would pick from 20 oversized cards that I made. 5 of the cards had an icon that represented one of the different stops, like a lollipop for the Lollipop Woods. If they got that, they had to go to that location and keep going. 5 more of the cards had two colored squares on them, so if you picked that you advanced to two spots of the same color. The other 10 cards had single colors on them, meaning if you picked one you just advanced one spot. I think we had ten dice total, five we made and five we were able to borrow and then modify. We usually gave each group two dice to make it go faster. Each group usually had at least one adult so I handed the dice to them so they could kinda monitor their group.

So they would go along the track until they reached the end. The first stop was the Peppermint Forest; Jess made a really simple design for the candy canes. They were cardboard cutouts painted red with white tape for the stripe. She wiped up about eight of them to make it an actual forest. This candy bucket was filled with peppermints. I dressed up as Mr. Mint because being Lord Licorice would be WAY too hard.

Next stop was the Licorice Castle and the candy bucket had licorice in it that kids could eat. I made that easily enough out of pool noodles and a box; I modeled it after our final Candy Castle to make it easier to store, but more on that later.

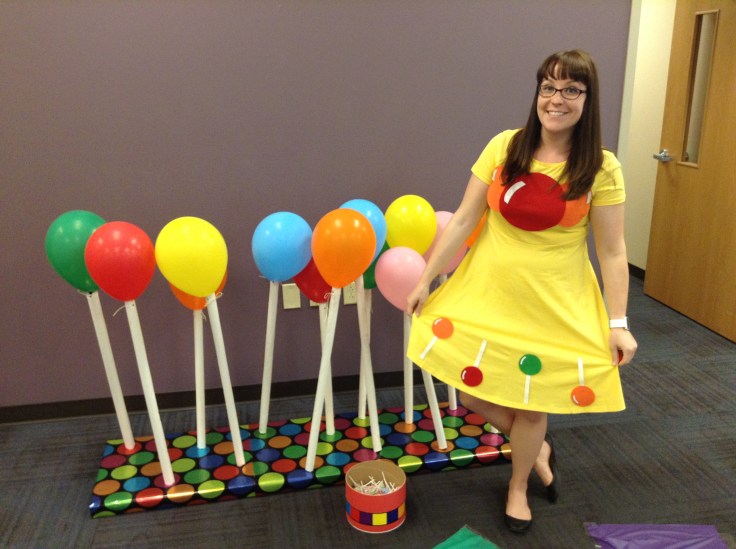
After that, kids went to the Lollipop Woods, which we borrowed from another library. To set this up we put wrapping paper rolls on some dowels to stand them up, and then topped them off with balloons. The candy bucket here was filled with Dum-Dums. Miss Gloria was awesome to dress up as Princess Lolly.
Next two stops were the Nut House and the Cupcake Commons. These ones were borrowed too and weren’t as impressive, but no one really noticed. Since it’s so prop-intensive, we plan on slowly adding to our different stops over time. For these stops, we just had regular candy due to nut allergies. Sorry Grandma Nutt.
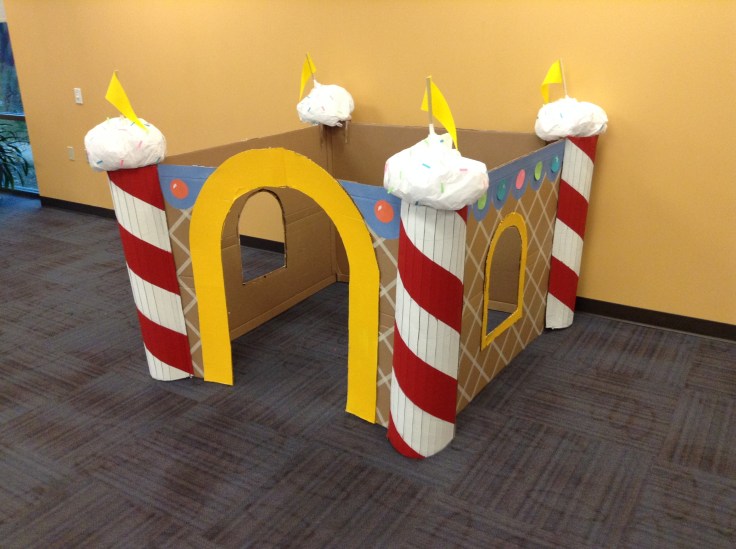
The last stop was the Candy Castle.The only instructions I gave Jess were that it had to be easily compacted to fit in our basement and it should be big enough for kids to hang out in. Jess ran with it and it turned out amazing!! The four walls are cardboard with masking tape to make it look like a waffle cone. They all compacted so we can easily store it against a wall downstairs. To make the four castle turrets she scored a regular piece cardboard, which means that she cut only the top surface of it and left the the back intact. So she made a bunch of scoring lines and curled it around to make a the turret. To make the ice cream toppers, she used (I think) a plastic bag, stuffed it with tissue paper, and tied it around a dowel with a felt flag at the end. Last she added sprinkles, everything is better with sprinkles.
All blog entries are for educational or personal use. Please credit the original author if reblogging or posting ideas originally found on this site. LEGO® is a trademark of the LEGO Group of companies which does not sponsor, authorize or endorse this site.


Looks like a lot of fun, and you all did a great job setting this up!! How many children and families do you typically have attend?
LikeLike
Thanks for sharing! I’m planning on doing something very similar and this was a huge help!
LikeLike